
Yesterday our company logo's and texts were applied to the bus . It looks stunning and very '70-s.
Showing posts with label Toy Car Garage. Show all posts
Showing posts with label Toy Car Garage. Show all posts
Saturday, May 24, 2008
The Bus!


Various items from last week
Another update. What happened last week? Well, the car lift is finally finished. All painted, and connected to electicity and it WORKS! Wonderful! Although it will never move again, as it will be in the 'up' position from now on.
Furthermore I finished working on the blister towers, made of old oil drums. And I spend one day working on the gas pump, which looks much better now!
Yesterday I started installing the shelves.


Friday, May 16, 2008
Car lift almost finished
I am so excited!!! The lift looks like a real lift again!
Wednesday, May 14, 2008
Opening: 7th of June!!!
It is final, we have set ourselves a deadline. The official opening of the Toy Car Garage will be:
June 7th 2008
from 13:00 till 17:00 hrs
There will be a giveaway car for each visitor.
Free beverages.
And a 1:1 car show!
For the car show, we can use any interesting vehicle! So if you own a classic, or just something special, bring it to the opening the 7th of June! In front of our Garage is a large, private, parking lot which can be filled with over hundred cars easily!
We will make this a very, very special day!!!
Painting the Car Lift II
The smell of paint is almost gone from my nose... last week, with lots of days off to work in the Garage, we only did a lot, and I mean a LOT, of painting!


Used till now:
2,5 liters of red
1,75 liters of white
Saturday, May 3, 2008
Painting the Car Lift
Finally we started painting the lift yesterday. It took centuries before preparation was finished and as a final action I had to remove a thick layer of some kind of tectyl from the 'runners'. Stuff that does solve when in contact with any kind of paint... Not a good base for some nice & fresh red & white colors!

Tuesday, April 29, 2008
Painting in Progress
A painter can make the difference! Here is 'my' painter applying the first coat of white.

Progress on the KONI car lift
As working on the lift is still a very dirty job (...) it is hard to take pictures while working on it. So I took these this morning when my hands were still clean!


Ikea!
For the shop shelves, we have selected the modular storage system from Ikea, called Broder


Monday, April 28, 2008


Saturday, April 26, 2008
The bus that brings a smile to your face
Today we got the new, 38 year old, Volkswagen Transporter T2a. What a nice ride it is! Everyone who sees it, immediately gets a smile on their face!
This is a 'easy does it' vehicle, top speed of 100 kmh max! But cruising at lower speeds is much more relaxing!
The day was also special because of the beautiful weather!
Welcome, little bus!


Thursday, April 24, 2008
Grease!
What a day... After my brother in law and I set up the KONI car lift last Tuesday, I started cleaning it Wednesday evening. After five minutes I had this feeling of 'I wish I never started ...'.
You will understand that a car lift of 58 years of age (!!) does have it's share of oil, grease, dust and sand. I have never seen a car mechanic cleaning his car lifts.
Anyway, I figured it would be better to remove most parts to clean them separately. And loose parts mean greasy parts, as they have to move or rotate. Today I spend all day removing these parts and cleaning the area's around them. Also, my brother in law helped me to clean the parts we took of the lift. He has a parts cleaner in his workshop.
Forgot to tell this lift is fully mechanical, no hydraulics or whatever. One electric 380 Volt motor drives a large pulley, which is linked to a gearbox that drives the two pulleys to which the ropes are attached. The gearbox is normally filled with oil, but mine does have a small leak so all and everything was covered in oil.
I'm done 3/4th now. Good thing is that where's grease, there's no rust!
Too bad I didn't take any pictures today. On the other hand, that would have been impossible with my greasy fingers...
Wednesday, April 23, 2008
Lights!
These lamps will decorate the Garage!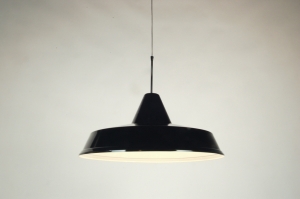
This company has a lot of very nice, retro lamps!
The KONI lift is up!
Yesterday we got the keys of the building, so we could finally start with our own work!
Frist of all, we have to assemble the KONI car lift. It needs a lot of TLC and in the process doing so it will generate a lot of dust!
The main frame is assembled now and I will start cleaning and degreasing the parts this week. When that is finished, it will be painted white (frame) with red (ramps).
The parts are really heavy and I am very lucky a brother in law is working at a neighbouring company who has access to thinks like fork lifts and such...
It was like a giant kit to be assembled, coming without any instructions manual, but being the smart guys as we are, we were able to figure it out and finished yesterday evening around 21:30 as shown in the pic:

VW Transporter T2a 1970
After considering many cars as candidate to become a Tiny Toy Cars company car, I finally found what I think is just the perfect car for the job.
Last weekend I purchased a 37 year old car... A Volkswagen Transporter T2a, from 1970!!! The current owner has maintained it very well and now I am going to use it as my company car for Tiny Toy Cars!


Tuesday, April 1, 2008
Doors & Windows


Thursday, March 27, 2008
Does it fit...
Today was a rainy day. Everything looked dull, gray and muddy.


Wednesday, March 26, 2008
The Wall
Today they built the separation wall. Now I finally have an idea of the actual size of the shop!


Saturday, March 22, 2008
Then and now...
Some of you might wonder why we need so much space to expand...
Well, here is a trip down memory lane...
Now fast forward to 2008...


Yes, we are looking forward to more ROOM!!!
Wednesday, March 12, 2008
Concrete floor finished
Today I took a couple of pictures of the finished floor.

The floor is 7 days old now and to be completely safe it will not be damaged, we have to wait 7 more days before they can restart any work in the building. And with the upcoming Eastern weekend, they decided to start after Eastern.
And a lot of things will happen then: removal of the old facade and installing the new one and building the separation walls!
WOW!
Subscribe to:
Posts (Atom)